Learn how to build the custom dialogs, process the workflow, and run Maximo actions from MaximoPlus.
This post is the fifth in a series that started with https://maximoplus.com/blog/getting-started-with-maximoplus/ .
Just like Maximo, MaximoPlus uses dialogs to execute the Maximo Actions that require user input. We will demonstrate the concepts you need to know on the example of the Change Status dialog, but the same is still applicable for the more complex cases.
First, let's see how to add the dialogs in the template. From the point of React Navigation, a dialog is a screen like any else. By convention, we define the dialog in the dialogs folder. Let us make the empty dialog first, and connect it to our app. Create the file POStatusHandler.js, and add the following:
import React,{PureComponent} from "react";

export default class extends PureComponent {
  static navigationOptions = ({ navigation }) => {
    return {
      headerTitle: "Change Status"
    };
  };
  render() {
    return (
      <>
      </>
    );
  }
}
Next, add the entry in the DialogStack const of DialogNavigation.js
pochangestatus: { screen: POStatusHandler }To open the custom dialog, we use the API function openDialog. Add the import openDialog from utils/utils.js to our screens/POSection.js screen.
In the same file, define the open dialog action:
const openStatusDialog = () => openDialog({ type: "pochangestatus" });
Following the steps from the previous blog post, add the button to the Navigation Header to execute that action. Now, let us add some logic to your dialog skeleton. Before we do that we need to gloss over some important concepts:
RelContainer
The RelContainer is the Container defined on the Maximo relationship, as described in Maximo Database Configuration. For example, the following represents the Container on the MboSet set on the poline relationship of the posingle Container:
<RelContainer id="poline" container="posingle" relationship="poline" />We know from our previous cases that the posingle Container is bound to the PO Maximo object. That means that our RelContainer links to the child of the poline relationship, which is a poline object. Once the parent container changes its current row, the data in the RelContainer is reloading.
Non-persistent Containers
In Maximo, most of the time, you need to specify the non-persistent MboSet before you can define the dialog for the action. Non-persistent MboSets are connected to the parent object using the Maximo Database Relationships. From the perspective of MaximoPlus, there is nothing special about the non-persistent containers; you need to use the RelContainer as well. For example, for the Container with the PO Status Change non-persistent MboSet, we define the RelContainer like this:
 <RelContainer
          id="pochangestatus"
          container="posingle"
          relationship="pochangestatus"
        />
We can now connect the section to the container:
<Section
    container="pochangestatus"
    columns={["status", "memo"]}
/>
Mbo Commands
We have our Section connected to the Container now. How does the user change the status once she fills in the data?
MaximoPlus Mbo commands execute the Java methods on the connected Mbo objects. You have two API functions at your disposal: mboCommand and mboSetCommand. The first executes the method on the current Mbo of the Container, while the latter runs the method on the MboSet bound to the Container. In our case we need the mboSetCommand:
mboSetCommand("pochangestatus","execute")The full example:
import React, { PureComponent } from "react";
import { RelContainer, mboSetCommand, reload, save } from "mplus-react";
import HeaderActionButtons from "../components/HeaderActionButtons";
import { closeDialog } from "../utils/utils";
import { Section } from "../components/Section";

const changeStatusAction = async () => {
  await mboSetCommand("pochangestatus", "execute");
  save("posingle");
  closeDialog();
};

export default class extends PureComponent {
  static navigationOptions = ({ navigation }) => {
    const rightButtons = [
      { key: "ok", label: "OK", action: changeStatusAction },
      { key: "close", label: "Close", action: closeDialog }
    ];
    const headerActionButtons = <HeaderActionButtons buttons={rightButtons} />;
    return {
      headerTitle: "Change Status",
      headerRight: headerActionButtons
    };
  };
  render() {
    return (
      <>
        <RelContainer
          id="pochangestatus"
          container="posingle"
          relationship="pochangestatus"
        />
        <Section
          container="pochangestatus"
          columns={["status", "memo"]}
          metadata={{
            STATUS: {
              hasLookup: "true",
              listTemplate: "valuelist",
              listColumns: ["value", "description"]
            }
          }}
        />
      </>
    );
  }
}
Security
If you tried to change the status using the above dialog, you would've got the Access Denied Exception. The mboSetCommand attempts to run the Java code directly on the MboSet, so we need to protect our application via the security access check.
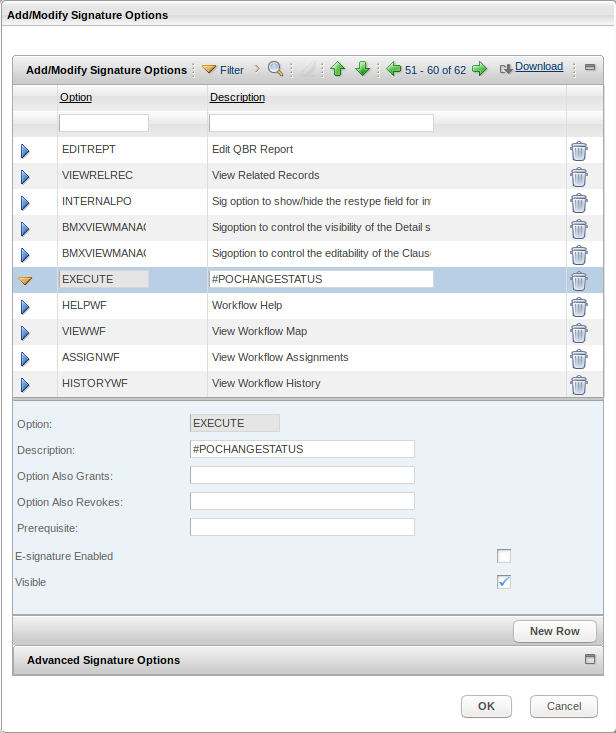
MaximoPlus uses the Maximo Security system to protect the application. However, protecting the individual method calls is not supported in the original Maximo Signature Security. MaximoPlus adds the additional security layer on top of Maximo Security, based on the following convention:
- The name of the option is the method name of Mbo or MboSet in upper case
- If the description starts with the hash (#), the description is the name of the relationship on which the method is called
- If there are more options with the same name (for example, more methods called execute on different relationships), you add the underscore and arbitrary symbol after it (example: EXECUTE, EXECUTE_1, EXECUTE_2...)
For our case, the name of the option will be EXECUTE, and the description #POCHANGESTATUS

Try to enter the above in Maximo Signature Security, assign the privilege to your group, and proceed with the status change.
Workflow
To route the workflow, you need to call the openWorkflowDialog API function, with the name of the Container and a workflow process name as arguments.
Example:
In the POSection.js screen, add the following action:
const openWF = () => openWorkflowDialog("posingle", "POSTATUS");Now bind this action to the header button, as described in the previous blog post.
To learn how the Offline Mode works in MaximoPlus, read the next blog post.
